Travlendar+
Mirko Mantovani and Matteo Marziali
Politecnico di Milano
A.A. 2017-2018
Software Engineering II project
![]()
Introduction
The main purpose of Travlendar+ is allowing users to easily manage their daily meetings and commitments, by providing some useful features such as finding the best means of transport to reach the appointment place and easily know the quickest route available to be punctual.\ Specifically, we want to realize a product which is able to:
-
Provide a calendar and the possibility to memorize events and appointments on it.
-
Automatically compute and account for travel time between appointments to make sure that the user is not late for them.
-
Automatically generate warnings to notify the user that at least two meetings are overlapping.
-
Provide routes and travels according to user preferences about the preferred/prohibited travel means and daily breaks set.
-
Provide the possibility to add reminders for a meeting in order to prevent the users forgetting their appointments.
-
Allow the users to modify appointment schedules.
-
Automatically notify people involved in a specific meeting if the user is late and has selected this feature previously. ——-
Implemented functionalities
The set of functionalities we actually implemented with respect to the ones we initially defined are:
[F1] Signup and Login
Travlendar+ users must sign up the first time they intend to use the App, further usages of the app will require a login to access all its functionalities. Logout which will invalidate the current session and take the user to the login page is also present.
[F2] Meeting creation
This is the most important function of the app, it allows to generate an event related to an appointment. It requires the user to define all the details such as date, time, location.
[F3] Preferences set up
An important feature of Travlendar+ consists in allowing the user to filter out specific routes depending on some constraints about the travel, or to set break-dedicated time slots. In particular the preferences we implemented are:
-
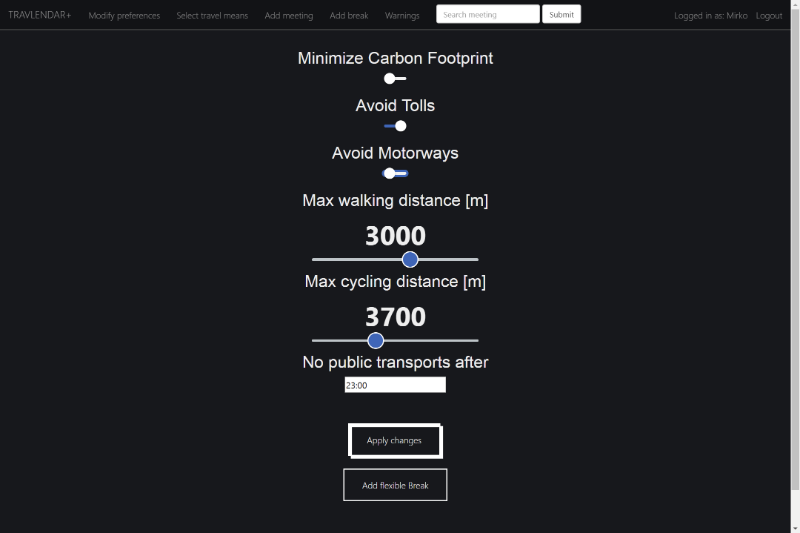
Minimize carbon footprint option, the result of flagging this option is that if possible (there exist at least a route and the travel means constraints are satisfied) only walking, cycling and public transportations routes will be taken into consideration.
-
Avoid tolls option which will only affect driving mode, only routes without tolls will be considered.
-
Avoid motorways option which will only affect driving mode, only routes without highways (motorways) will be considered.
-
Setting up a maximum walking distance and taking into consideration only the routes which satisfy this constraint
-
Setting up a maximum cycling distance and taking into consideration only the routes which satisfy this constraint
-
Setting up a time from which the routes involving public transportations will be discarded, in particular, the User can select the time between the range 18:00 and 5:30, from that time till the morning any route involving public transportations will be avoided.
-
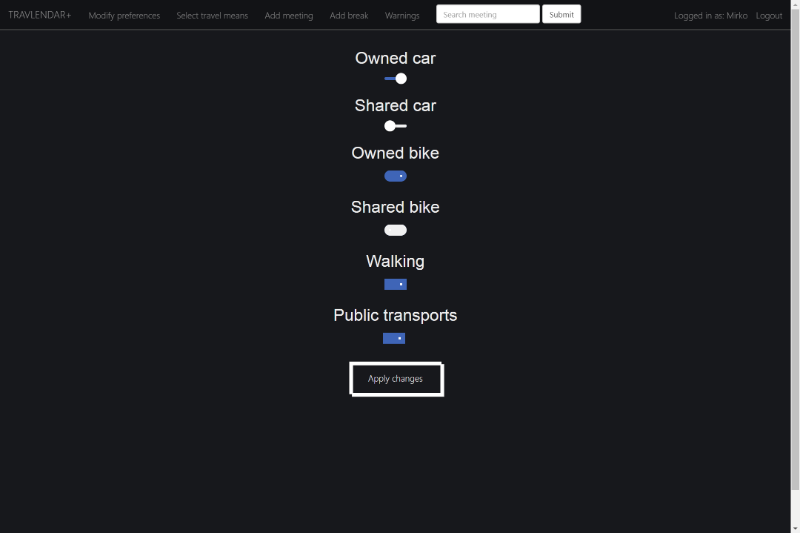
Specifying the travel means the user intends to use for his travels, possible travel means are:
-
Owned car
-
Shared car
-
Owned bike
-
Shared bike
-
Walking
-
Public transports
-
[F4] Warnings management
In case a warning is generated by the system due to a possible overlap among two or more meetings, the user must solve the warning. In other words, the user has to decide whether he wants to ignore the warning notification or he intends to modify some meetings to be sure that he can reach and participate to all his appointments. In particular the warning are created if:
-
There exists a break in the database and the user adds a meeting that makes the break impossible to actually be scheduled in the allowed time, this case happens if the overlapping meetings don’t leave a free interval within the break range which is greater or equal to the break minimum duration.
-
The minimum amount of time in order to get to the previous meeting location to the inserted one exceeds the interval there is between the ending time of the previous meeting and the starting time of the newly added meeting.
-
The added meeting partially or totally overlaps in any possible combination with one or more meetings already present in the database. In this case a warning containing all the involved meeting is created
Notice that there should not be a meeting appearing in more than one warning, if that is the case a cleaner method is periodically invoked in order to mantain this consistency, there can also exist warning containing one or more breaks and one or more meetings, however, no warning consisting in only breaks without meetings.
[F5] Route generation
When requested, the app is able to find a route, if possible, from the specific location the user is at in the moment to the location of the considered meeting, the suggested travel will fit and satisfy the selected preferences.
[F8] Update/Delete meeting
This function is both basic and relevant, it allows the user to customize his meetings after their creation. In particular, everything except the name (since it’s part of the identification of the meeting) can be modified.
[F9] Add/Delete break
This feature at first was specified as part of the preferences, however, since we considered that this is one of the main features, we named it alone as an independent functionality. The Flexible break is a slot of time in the day to be reserved for specific purposes (such as a lunch for example), the break has a starting time and an ending time, which are the extremes times in which the break must be contained, the break itself however will only last the time specified by the Duration attribute. The day to specify for the break is in the form of the day of week (monday, tuesday, ecc.), which means the first occurrence of that day of week from the creation time. The Break could also be recurrent, which means every week in that day of the week a break will be scheduled. The break is flexible in the sense that the actual break only lasts for a time specified by the duration and Travlendar will make sure that the user has at least that free time available inbetween his meetings, if not a Warning will be generated.
[F10] Search meeting
An added functionality with respect to the ones we initially defined is the seach meeting, it allows the user to search for a meeting by typing part of the name, the result will be the page of the best match meeting page, if any.
User Experience
Mockups of the User Interface
Concerning the user interface requirements, we established to directly provide information about the application screens and layout through several mockups. We designed the sketch of the main pages of Travlendar+ following our aim to make a light and user friendly product but, at the same time, we have pursued an attractive and impressive style Apparently, the coding phase could affect our desing. Hence, these sketches are not definitive, their aim is to give an idea of the application design. For this reason, if we notice that some changes are necessary due to either app. improvement or obstacles in realization, we would be ready to modify them.
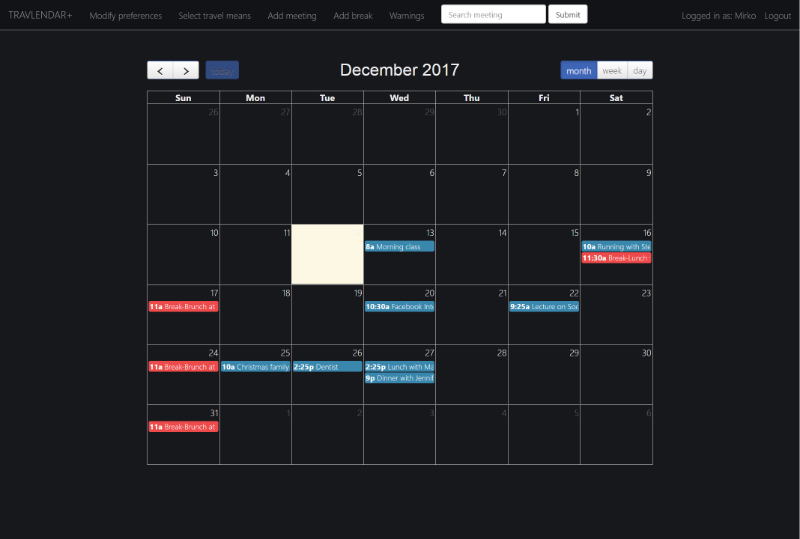
Homepage
To pursue our aim of realizing a user-friendly and light app, we decided to provide the main functions directly in the homepage. Indeed, from this page, a guest can reach the sign up form, a user can log himself in,can insert a meeting by tapping onto a day in the calendar,can manage his preferences and even access the warnings
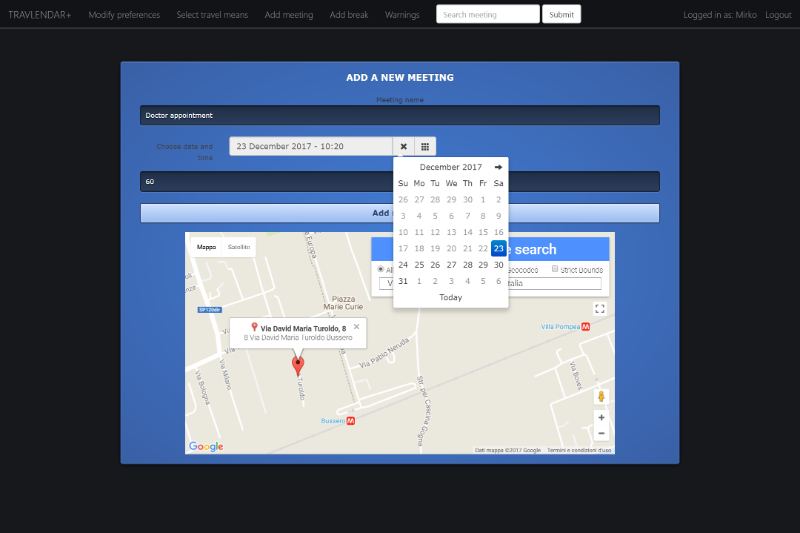
Meeting Creation
This page is a very simple form, which allows the user to finalize the creation of a meeting by filling it in all its fields. The house-logo in the right corner,on the top band and near the application name, represents the return-to-homepage icon.
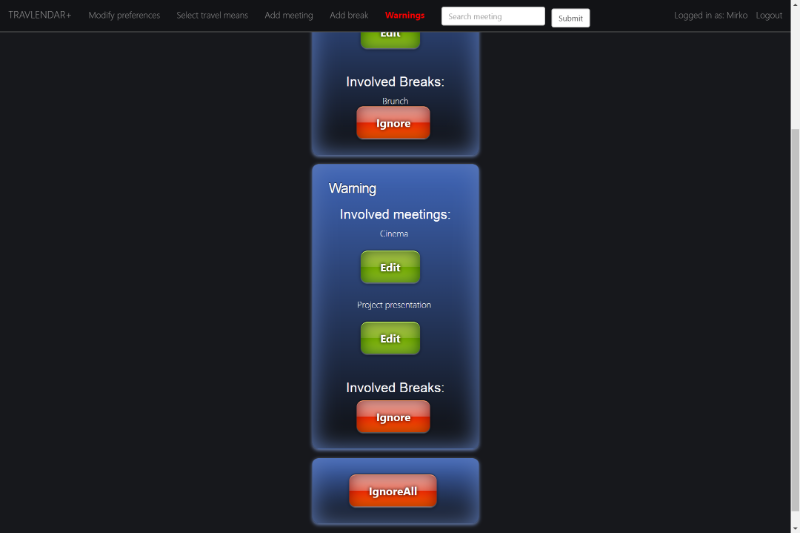
Warning Page
The warnings page has the role to summarize and notify all the conflicts among meetings which involve the user’s appointments. Every warning is represented by a dialog which points out the meetings that generate the conflict and which has two buttons, one to ignore the warning and other one to solve it by modifying the conflictual meetings. To prevent too much user’s clicks, an “ignore all” button is provided, which is equivalent to tap “ignore” for each warning in the list.
Travel means preferences
This is a very simple page with a minimalistic design, not to uselessly load the application. However, this basical view provides all the functions which the user needs to select his preferences related to the transports for his travels. Please notice that the preferences section can be changed by tapping on an specific topic just below the “Preferences” bar.
Route preferences
The route preferences page is very similar to the Travel mean preferences page. The style is the same and the opportunity to flag or unflag elements too, however there are differences. Some of the preferences in this section are mutal exclusive, so the user is prevented to select more than one of them (for instance a user can select either the shortest route or the fastest). Moreover, some selection element has customizable details, they are represented with a pencil logo on the right, and can be managed by the user to best fit his preferences (for example the user can select after which hour he does not want to use public transportations).
Adopted development frameworks
Adopted programming languages
To implement Travlendar+ we mainly used Java. The front-end was created using HTML, css and javascript while the back-end is plain Java and for it we adopted some of the functionalities that JEE provides.
Adopted middlewares and libraries
We could say that the main middleware we used is Glassfish Web server, it provided us with the functionality of using the Java Persistence API framework in an easy way, allowing us to define and create the entities in the database and mapping them to Java classes. Other adopted frameworks are bootstrap and jquery, in order to simplify the creation of an enhanced UI/UX. The only library we used is json.simple, a library to simply parse the JSON files arrived as a response by the Google Maps APIs in order to retrieve specific and useful information.
Used APIs
The main APIs we interfaced with are Google Maps APIs, such as:
-
Google Maps Distance Matrix API to: Estimate travel time and distance from origin to destination.
-
Google Maps Directions API to: Calculate directions between origin to destination specifying the means of transport.
-
Google Maps Place Autocomplete to: Input real addresses for meetings avoiding mispelling of addresses
Source Code structure
The following two subsections will be needed for any external person in order to understand the code structure and possibly modify or extend the Application.
Back end code structure
The back end code of the application is logically subdivided into four Source Packages:
-
Entities: This package contains all the Java entity classes which, due to the JPA mapping to the database entity tables, allow us to directly manipulating persistent data by simply setting fields of the relative instances. Each of these classes has a few named queries to easily retrieve data sets from the database, fields with specifications defining the SQL type and constraints on the attributes of the database tables, and getters/setters.
-
Servlets: This package contains all the servlets which are needed by the server in order to handle http get/post requests and responses, most of the used and significant endpoints are managed in these servlets. In our case servlets can either process data in the requests and interact with Java beans in order to make some changes in the persistent memory, or they are used as access points to JSPs and their purpose in this case is mainly that of customizing the JSP based on the User Session.
-
Session Beans: This package contains all the EJB needed both for interacting with the database and to run concurrently some weighty and onerous algorithms such as conflict checking between meetings. The common abstract class AbstractFacade exposes methods to interact with the database by mapping the methods to the corresponding method call on the JPA EntityManager interface. One facade per entity extend the abstract one and contain a few additional methods to handle queries if needed.
-
Utils: This package mainly contains plain Java classes with static services methods to be used by servlets and Beans.
Front end code structure
The front end of the application is primarily composed by JSPs, in which we decided not to put any scriplets in order not to have the possibility for any runtime exception to occur. We thought it would be better to have semantical incorrectness than exceptions, that is why we decided to use JSTL/EL to give dynamicity to the plain html code of the JSPs The JSPs html code is enriched with css and javascipt to make it more appealing and responsive. We also used and included in the source code jquery framework and bootstrap.
Testing
In order to evaluate the consistency and the reliability of our application we have conducted some unit tests The tests regard the business logic tier, the core of the application in terms of complexity and relevance of computation Considering that the business logic classes interacts directly with data in the database, we had to adopt a specific framework, named “Mockito” to Mock the method calls which retrieve data from the database and to specify an action to be performed in case of calls during testing execution It is relevant to say that we adopted this mocking framework assuming that the operations related to reading and writing data in the database are executed correctly, indeed they are not tested with a proper testing component. However, we are quite confident that this assumption is consistent because we checked it informally As far as the unit test are concerned, we have checked them using jUnit libraries Finally, we have tested also that the calls to the Google Maps APIs,in particular the Distance Matrix API. We checked that it was executed correctly and that the retrieved information was consistent Further details about the test cases and the related outcomes have been included in the document
JUnit and Mockito
Meeting vs. Meeting Conflict
This test case has the purpose to evaluate the method to check whether two meeting are in conflict. Considering that this kind of evaluation involves two meetings at a time, we have built two meetings, we have assigned them overlapping schedules and we have tested the execution of the method ’CheckMeetingOverlaps(Meeting m)’ of the class ConflictCheckerBean.java . The result of the test was consistent with the expected outcome.
Meeting vs. Break Conflict
This test case was made to check whether the conflict among meetings and breaks was computed correctly. Due to the fact that the comparison involves one meeting and one break at a time, we have built a break and a meeting that should have been overlapping and we tested the execution of the method ’BreakConflictChecker(Meeting m)’ of the class ConflictCheckerBean.java . As we expectd, the outcome certified that the conflict was computed.
Flexible break rescheduling
In order to verify the flexible break rescheduling, one of the main functions of Travlendar+, we made an apposite test case. This analysis simply consists in calling the method checkReschedule(String uid) of the class ConflictCheckerBean.java and checking that the outcome, in case the flexible rescheduling is infeasible, reports that effectively the meeting and the break are in conflict.
Warning existence
this test case regards this specific situation: a new Meeting is inserted in the db and according to its conflicts, it should be added in an already existent warning in the database. Hence, this analysis tests whether the already existent warning to be updated is retrieved correctly. To perform the test we have simulated the insertion of a warning in the database and we have created a meeting that had to be added to the existent warning. Then, we have called the method ’checkWarningExistence()’ of the class ConflictCheckerBean.java and we verified that the outcome was consistent. Finally, for completeness, we replayed the test to check also a situation in which a new warning has to be created.
Retrieve duration
The current test case has the purpose to verify the interaction between our application and the Google Maps APIs. In particular we checked that the requested information is retrieved correctly by testing if the duration of a specific travel is correct, doing this we also tested the connection with Google servers and the correctness of our queries. In other words we called the method retrieveDuration(String origin,String destination, String uid, Date date) of the class RouteCalculatorBean().java and we passed them an origin and a destination parameter for which we already know the travel duration and we expected the same outcome.
JMeter
We also made a really trivial test to evaluate the non-functional requirements and in particular the performances given an high number of clients requesting a resource. The test was done using JMeter and the simple test consisted having a thousand users trying to access the application by performing a login and visiting the homepage, the requested are done almost all at the same time (ramp-up period equal to zero which means no delay between requests) As you can see from the below graph the latest visited the homepage after less than 3 seconds, which suggests than the performances of the server are already a bit stressed and if the same amount of users requested a more sophisticated resource that would require computationally onerous algorithms by the server, the amount of time requires would probably not be reasonable for a user experience point of view. Notice however that, in such an application, users would mostly navigate in a burstly way, which implies that in order to have a thousand requests at the same exact time, the number of users would have to be much larger than a thousand.
Installation Instructions
Quick Installation for Windows
The quick installation consists in downloading Glassfish 4.1.1 with the script to install Travlendar and the war file already in it.
-
Download the JDK if you don’t have it already from\ http://www.oracle.com/technetwork/java/javase/downloads/jdk8-downloads-2133151.html, usually it is stored in C:\Program Files\Java, put it there or wherever you prefer, keep in mind or save the path where you put it.
-
Download the zip by clicking on this link:\ https://www.dropbox.com/s/itycorsvfimpy5w/glassfish-4.1.1.zip?dl=1, unzip the folder and put the contained folder (glassfish-4.1.1) in C:\Program Files. In case you have a different JDK from the jdk1.8.0_121 version, or you have it in a different folder than the default one, navigate to\ C:\Program Files\glassfish-4.1.1\glassfish\domains\domain1\config, open domain.xml file search for java-home attribute (there is only one, the one of java-config node) and substitute C:\Program Files\Java\jdk1.8.0_121 with the path of your JDK.
-
Then open the glassfish-4.1.1 folder and double click on installtravlendar file.
-
Click yes to the popup that asks if you want to run it as administrator.
-
Write down in the Command Prompt the JDK path when asked for it, for example write: C:\Program Files\Java\jdk1.8.0_121
-
Press enter.
-
Wait for the command prompt to close itself then Travlendar should be installed correctly.
-
Launch travlendar by double clicking on Travlendar+ file in glassfish-4.1.1 folder.
-
If everything went fine the default browser should have been launched and you should see the login page of the app, signup and enjoy the app.
System Requirements
JDK
In case you don’t have any version of Java Development Kit you should download its latest version from:\ http://www.oracle.com/technetwork/java/javase/downloads/jdk8-downloads-2133151.html
Glassfish Web Server
Being Travlendar+ a web application, it is essential to have a web server installed, here we provide information about the installation and deployment on Glassfish 4.1.1. You can download it from\ https://javaee.github.io/glassfish/download\ or alternatively, you can follow the quick installation instructions for Windows, which includes a Glassfish installation.
DBMS
For simplicity, we decided to use the basic DBMS provided by glassfish, Apache Derby RDBMS, thus you do not need anything else if you have installed Glassfish Server.
Browser
For the development and testing we always used Google Chrome as browser, we recommend installing the latest version of Chrome and we do not guarantee the absence of bugs and poor performances on other Browsers, even if they would probably work just as fine.
Manual installation - Environment Setup
Starting up Glassfish Server
-
On Windows, open command prompt as administrator (right click on cmd.exe and click Run as administrator), on Linux or MacOS open Terminal.
-
browse to Glassfish installation path and open bin folder, usual installation path on Windows: C:\Program Files\glassfish-4.1.1\bin, execute command cd C:\Program Files\glassfish-4.1.1\bin
-
execute command asadmin start-domain
After the server has started you will be able to access the Admin Console at\ https://localhost:4848 and the web server at\ https://localhost:8080\ (If you need to stop Glassfish server just execute command asadmin stop-domain
Setting up JDK path
Sometimes an error is displayed if Glassfish does not find the JDK automatically, you can execute the command\ asadmin set “server.java-config.java-home=C:\Program Files\Java\jdk1.8.0_121”\ Just substitute C:\Program Files\Java\jdk1.8.0_121 with your path to the JDK you previously downloaded.
Database configuration
In order to make it simpler to create the database you can download the already configured Derby database from\ https://www.dropbox.com/s/8c8rjc40b86wj77/travlendar.zip?dl=1\ Unzip it and put it in the folder: \glassfish\databases\ in the glassfish installation path (on Windows usually\ cd C:\Program Files\glassfish-4.1.1
Starting Apache Derby DBMS
Execute command\ asadmin start-database\ in order to start the database.
Be sure the port is the default one (1527) If at any moment you want to stop the database just execute command\ asadmin stop-database
Application Deployment
After having configured and set up the environment, download the .war
file Travlendar.war at\
https://github.com/MatteoMarziali/MarzialiMantovani/releases/download/v1.0/Travlendar.zip,
unzip it where you prefer
You can now follow one of these ways in order to deploy the Application
on Glassfish.
Manual deployment from Admin Console
After the server has started you will be able to access the Admin
Console at\
https://localhost:4848\
Click on Applications tab on the left. Then click Deploy... button.
Click on Choose file and select the Travlendar.war release file
previously downloaded, then click ok.
If everuthing went fine you should see something similar to this.
Just click on Launch to start the application
You can access the application opening the URL:\
https://localhost:8080/Travlendar
Manual deployment from Command Line
Supposing you already started the server and the database, and you are
in the bin folder in the Glassfish installation path, just execute\
asadmin deploy C: \Users\Mirko \Desktop\Travlendar.war\
substituting C: \Users\Mirko \Desktop\ with your path to
Travlendar.war release file.
You can now access the application by executing\ start http://localhost:8080/Travlendar/ on Windows, open http://localhost:8080/Travlendar/ on MacOS X, or xdg-open http://localhost:8080/Travlendar/ on Linux, or simply open the browser and type localhost:8080/Travlendar in the URL bar and press Enter.
Autodeployment
Just put the Travlendar.war file in
<GlassFish-Installation-Path>/domains/domain1/autodeploy and
restart the server.
Running the app
Once the deployment is finished you can access the Application at localhost:8080/Travlendar on a browser in your local machine, at 192.168.1.3:8080/Travlendar on a device connected to the same LAN (just replace 192.168.1.3 with the private IP address of the machine the server is running on You can even access the application from a remote device, you just need to open the port 8080 of the router of your LAN by creating a virtual server and NATting the external access onto the private IP address of the machine your server is running on (private IP should be configured as static). Then you can access from wherever you want just by going to xx.xx.xx.xx:8080/Travlendar, replace xx.xx.xx.xx with the public IP address of your router.
Possible issues and solutions
If you encounter any problem in the deployment regarding a database connectivity problem you could download Netbeans IDE (which includes Glassfish and Derby installation) and replace the Environment setup steps by creating a database with databasename = travlendar, name = mirko, password = mirko. Start glassfish server from there and then pass to the deployment phase as explained in these instructions If also this does not let you deploy the app as last chance you could clone the travlendar repository, import it as a project in netbeans build and clean the project, and run it.